古法懸灸筒怎麼選?從金艾柱到固定方式的高效使用指南

古法懸灸筒怎麼搭配艾柱使用?從套筒結構到貼布固定的入門指南

✅如果你曾經遇過「艾灸位置不穩、溫度忽高忽低、貼布容易滑動」的狀況,古法懸灸筒的設計正是為了讓施灸更可控。這套組合包含懸灸筒*2、透明膠貼24貼、彈力綁帶*1、50:1金艾柱*24,適合腰、腹、頸、腿、肩等部位的操作。

⭐為什麼選懸灸筒?重點在「固定+通風+插入」

  • 套入筒孔:讓艾柱燃燒位置更集中
  • 透明膠貼固定:沿切線揭貼後更好定位
  • 通風口調節:風口越大,溫度越高(可依感受微調)

📌這套組合適合哪些情境?

想在家進行規律艾灸、需要更穩定的施灸流程、並希望能依部位與舒適度調整溫度的人,會特別有感。

(示意圖)懸灸筒與艾柱插入位置,幫助你建立正確操作視覺。

✅推薦操作流程:從套筒到貼布固定一次到位

  1. 將懸灸筒套入膠布圓孔內:先把筒體與貼布孔位對齊。
  2. 將艾柱插入筒內並點燃:確保插入後位置穩定再開始施灸。
  3. 調節通風口:風口越大,溫度越高;可先從小風口開始。
  4. 沿切線揭掉兩邊貼紙:找準施灸部位後固定好。
  5. 開始艾灸:建議每個部位約15–20分鐘,以溫熱舒適、皮膚潮紅為宜。

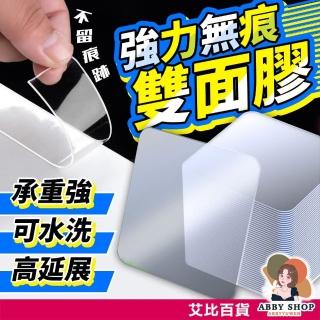
(示意圖)透明膠貼固定後的定位方式,降低位置跑掉的機率。

比較小提醒:你會用到的「可調」與「不可忽略」

項目 你可以做什麼 為什麼重要
通風口 風口越大溫度越高 讓溫度更符合當下舒適度
貼布固定 沿切線揭貼後對位固定 降低施灸位置偏移
艾灸時間 每部位約15–20分鐘 避免過久造成不適

FAQ:第一次使用古法懸灸筒常見問題

Q1:風口要怎麼調?

建議從較小風口開始,感到溫熱舒適再逐步調整;若覺得灼熱不適,請調整位置或停止施灸。

Q2:透明膠貼固定後會不會滑掉?

沿切線揭掉兩邊貼紙後,先找準施灸部位再固定,通常能提升穩定度;若需要更服貼,可搭配彈力綁帶協助固定。

Q3:哪些人不建議施灸?

飯前後1小時、激烈運動後、皮膚有傷口、疲勞、醉酒、孕婦、經期及幼童皆不宜施灸;對成分過敏或皮膚受傷者禁止使用。

📦想把艾灸做得更穩、更好重複?現在就把懸灸筒流程帶回家

從套筒套入、艾柱插入點燃、通風口微調到透明膠貼定位——你需要的「可控步驟」都在這套古法懸灸筒組合裡。

提醒:本商品為外用,勿入眼、口、鼻;艾灸時注意室內通風,並於施灸後多喝溫開水。


English Version

How to Use an Ancient-Style Hanging Moxibustion Tube? A Beginner Guide (Tube + Transparent Patch + Moxa Stick)

Learn the complete, repeatable workflow for using the ancient-style hanging moxibustion tube: how to insert the moxa stick, fix the tube with the transparent patch, and fine-tune temperature via the airflow vent—so your sessions feel steadier and more comfortable.

Why Choose a Hanging Moxibustion Tube?

The tube structure helps concentrate the moxa burning position, while the transparent patch and airflow vent make the session easier to control. This set is designed for practical at-home use on areas such as the waist, abdomen, neck, legs, and shoulders.

Step-by-Step Setup: From Tube to Patch Fixing

1) Fit the hanging tube into the circular hole of the patch. 2) Insert the moxa stick into the tube and light it. 3) Adjust the airflow vent—larger vent means higher temperature. 4) Peel along the cut line and fix the patch to the target point. 5) Moxibustion time is typically about 15–20 minutes per area.

Quick Reference: What You Can Adjust vs. What to Watch

You can adjust temperature mainly through the airflow vent and by repositioning if needed. Key reminders include maintaining indoor airflow, avoiding use on broken skin, and following the recommended time window for comfort.

FAQ for First-Time Users

Common questions include how to start with a smaller airflow setting, how to improve patch stability (optionally using the elastic band), and who should avoid moxibustion (e.g., pregnancy, menstruation, children, and people with skin injuries).

🛒 你可能會需要

Amazon 推薦

透明薄膜敷料 4 英吋 x 4 英吋(約 10.1 x 12.1 公分)盒裝 30 入 - 防水繃帶 適用於游泳、淋浴、傷口、手術後淋浴或 IV 防護罩 紋身後繃帶 疤痕療法 黏貼貼
透明薄膜敷料 4 英吋 x 4 英吋(約 10.1 x 12.1 公分)盒裝 30 入 – 防水繃帶 適用於游泳、淋浴、傷口、手術後淋浴或 IV 防護罩 紋身後繃帶 疤痕療法 黏貼貼
查看商品
Dimora 透明薄膜敷料 50 件組 防水黏著透明繃帶 4 英吋 x 5 英吋(約 10.1 x 12.7 公分),傷口蓋 適用於 IV 護罩 紋身後繃帶 透明繃帶 適用於傷口護理
查看商品
NeuHeils 透明薄膜敷料 2 3/8 英吋 x 2 3/4 英吋,100 入,防水傷口覆蓋繃帶,透明 IV 導管膠帶,黏性貼,淋浴罩
查看商品

MOMO 推薦

【上手家居】無痕壓克力貼 350貼組(雙面膠/圓形貼/透明貼紙/雙面膠帶/圓點貼紙/透明雙面膠/圓形雙面膠)-momo購物網 - 好評推薦 - 2026年4月
【上手家居】無痕壓克力貼 350貼組(雙面膠/圓形貼/透明貼紙/雙面膠帶/圓點貼紙/透明雙面膠/圓形雙面膠)-momo購物網 – 好評推薦 – 2026年4月
$399
查看商品
【ABBY SHOP】強力無痕雙面膠 無痕雙面貼 無痕透明貼 透明無痕貼 壁掛無痕貼 雙面黏膠 方形貼 無痕貼 無痕膠 雙面膠 膠帶
$45
查看商品
【上手家居】無痕壓克力貼 70片組(雙面膠/圓形貼/透明貼紙/雙面膠帶/圓點貼紙/透明雙面膠/圓形雙面膠)-momo購物網 - 好評推薦 - 2026年4月
【上手家居】無痕壓克力貼 70片組(雙面膠/圓形貼/透明貼紙/雙面膠帶/圓點貼紙/透明雙面膠/圓形雙面膠)-momo購物網 – 好評推薦 – 2026年4月
$490
查看商品

📚 延伸閱讀

📢 加入LINE官方帳號,領最新優惠與生活資訊

社區資訊、補助整理、好物推薦,不漏接

立即加入LINE好友
返回頂端